


Background Eraser
handyCloset Inc.
I like photo tools that solve one job without making me learn a full editing suite, and Background Eraser is built around exactly that idea. It is a free photography app from handyCloset Inc. for cutting out parts of a picture and making the background transparent. After trying it with ordinary phone photos, product-style images, and simple profile graphics, I found it most useful when I needed a clean subject quickly rather than a complete retouching workflow.
The basic promise sounds narrow, but it covers several practical tasks: isolating a person, removing a plain wall behind an object, preparing an image for a collage, or creating a sticker-like cutout. The app has been available since March 29, 2014, and its long presence is reflected in a 4.7 average from around 987 thousand ratings. That does not make every result perfect, but it does suggest that the simple cutout workflow has remained useful to a large audience.
What using Background Eraser feels like in practice
The first thing I noticed is that the app is easier to understand when I treat it as a preparation tool, not as a complete photo editor. I choose an image, work around the area I want to keep or remove, and then refine the edges until the subject looks acceptable. The goal is a transparent-background image, so the important question is not whether the original photo looks beautiful inside the app. It is whether the extracted subject can be reused somewhere else without an obvious halo or missing piece.
That distinction matters. If I want color correction, lighting adjustments, text overlays, filters, or a polished social-media composition, I would normally move the result into another editor. Background Eraser is strongest at the cutout stage. Keeping that expectation makes the interface feel focused instead of limited.
For a quick everyday example, imagine photographing a small item that you want to place on a marketplace graphic. I can start with a reasonably bright image, remove the surrounding table or wall, and save the object as a transparent image. The next step might happen in a design app, a presentation, or a messaging tool that supports transparent images. The useful part is that I do not have to erase the entire background manually with a tiny brush from the beginning.
Latest News
Uber Eats Under Pressure: What Happens When Delivery Goes Wrong
How QR & Barcode Scanner Adapts to Android and iOS Innovations

Why Waze Navigation & Live Traffic Is Your Essential Travel Companion
CapCut Mastery: Unleash Hidden Features for Pro-Level Editing

How OS Updates Enhance Roblox Adventures
Teacher Simulator: Exam Time Turns Quick Classroom Judgments into a Repetitive Loop
The biggest practical advantage is control over the boundary between subject and background. Automatic removal can be convenient, but hair, thin handles, plant leaves, and transparent objects often need human correction. A tool that lets me inspect and repair those areas is more valuable than one that produces a fast but visibly rough cutout.
Why the app remains approachable
Many mobile editors put background removal inside a large collection of unrelated effects. That can be helpful for advanced creators, but it also means hunting through menus before reaching the task I actually need. This app feels more direct because its purpose is clear from the start. Someone who has never used layers or masking can understand the basic idea: keep the subject, remove the surroundings, and export the result.
I also appreciate that the workflow encourages zooming into difficult edges. At normal viewing size, a cutout can look fine while still carrying a thin strip of the original background. That strip becomes obvious when the image is placed over a contrasting color. My advice is to check the result against both a light and a dark background before deciding it is finished. This catches pale halos around clothing and dark remnants around hair much earlier.
Gallery
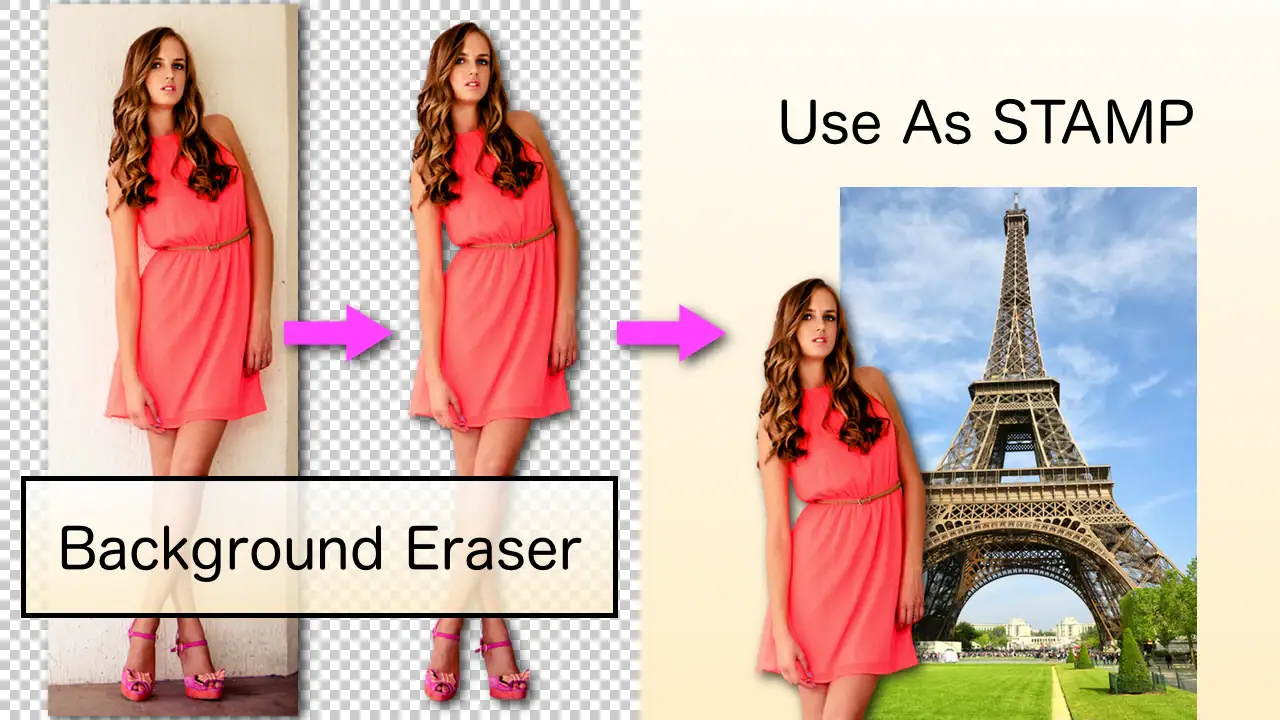
The app is particularly comfortable with images where the subject and background have different colors and fairly clear boundaries. A person standing in front of a plain wall, a product on a single-color surface, or a bold illustration usually gives me a better starting point than a crowded street photograph. The quality of the original image matters as much as the editing skill: blur, compression, shadows, and low contrast all make the boundary harder to judge.
Three workflows that make a real difference
My first useful habit is to make a rough selection before spending time on tiny details. If I try to perfect every edge immediately, I can waste time correcting an area that later turns out to be outside the final crop. I work from the larger shape inward, then zoom in only where the subject meets a complicated background. This is faster and produces a more consistent outline.
The second is to save an intermediate version before making aggressive corrections. Background removal is one of those jobs where a single accidental stroke can delete part of a sleeve or leave a notch in a circular object. Keeping an earlier result gives me something to return to instead of restarting the entire image. This is especially helpful when the same photo needs two versions, such as a tight cutout for a sticker and a looser one for a collage.
The third is to use the app for compositing preparation rather than judging the cutout in isolation. I test the transparent image over the color or photograph where I expect to use it. A border that is invisible over the original checkerboard-style preview may stand out on a solid black background. Conversely, a slightly rough edge may be perfectly acceptable for a small thumbnail but distracting in a large poster. The right level of precision depends on the final size.
These habits reveal an important trade-off: Background Eraser can give me a useful result quickly, but it still rewards patience at difficult edges. It is not a magic replacement for detailed masking. When I need a professional-looking portrait with loose hair against a busy background, I would rather use a more advanced editor with a dedicated mask workflow and spend more time refining it.
Where it fits beside other photo editors
Compared with a general mobile photo editor, this app has less visual clutter and a clearer purpose. A general editor is better when the cutout is only one small part of a larger project. It may offer stronger typography, layers, color tools, and export options. Background Eraser is better when I already know that transparency is the main thing I need and I want to reach that step without navigating a full creative workspace.
Compared with automatic background-removal services, the important difference is the opportunity to inspect the result and correct it manually. Automatic tools can be impressive on clean portraits, but they may make unpredictable decisions around objects that touch each other. A manual correction path gives me more agency, although it also asks me to do more work. I would choose this app when the image is simple enough for hands-on editing and I want to see exactly what is being removed.
Compared with a desktop graphics program, it is naturally more convenient for a phone photo and a quick share. The compromise is precision and depth. Desktop software is the better choice for complex masks, repeated professional production, color-managed work, or a project that needs multiple editable layers. Background Eraser makes more sense for casual creators, small businesses preparing occasional images, students making visual materials, and anyone who does not want to learn a large application for one task.
Trust, permissions, and moments that deserve attention
Because this is a photography app, the most sensitive part of using it is the image itself. A photo can contain a face, a child, a home interior, a document, or an item that was never intended for public sharing. I therefore treat the image-selection step as a privacy decision, not merely a technical one. Before importing a picture, I ask whether I really need to edit that particular file or whether a cropped copy would be safer.
I also avoid using personal documents as test material. A passport, school card, receipt, or screenshot with account details may be easy to cut out, but editing it creates an unnecessary copy of sensitive content on the device. For experiments, I use a harmless landscape, a product photo, or an image created specifically for the task. This is a simple way to reduce exposure without giving up the app’s main benefit.
The app is free, which makes it easy to try without a purchase decision, and it carries a Teen content rating. Those details do not remove the need for judgment when editing someone else’s photograph. I would ask permission before altering a friend’s portrait for a public post, especially if the new background changes the meaning of the original image. The technical ability to isolate a person does not automatically make every use respectful.
When I finish, I review the image gallery and the destination app rather than assuming the job ends at export. If I created several failed attempts, I remove the ones I no longer need. I also check whether the final transparent image is being shared publicly or only sent to one person. This is not a criticism unique to Background Eraser; it is a sensible routine for any tool that handles personal photos.
For people who care about account control, the app is most comfortable when used for a small, clearly defined task and when the user pays attention to the choices shown during image selection, saving, and sharing. I do not treat a simple interface as proof that every privacy question is solved. Instead, I make deliberate choices about which image to open, where to save the result, and which app receives it next.
Who should use it, and who should skip it
I would recommend Background Eraser to someone who regularly needs transparent cutouts but does not want a full design program. It is a good fit for making profile graphics, preparing simple product images, creating stickers, removing a distracting background from a casual portrait, or isolating an object for a school project. The free price also lowers the barrier for occasional use, when paying for a larger editor would feel excessive.
It is also useful for people who prefer to make their own corrections instead of accepting an automatic result. If I am willing to zoom in and check edges, I can often get a more dependable outcome than a one-tap tool gives me on a complicated but still manageable photo. The app’s popularity, with over 100 million installs, makes it easy to understand why this focused approach appeals to so many phone users.
I would skip it when the background is highly detailed and the subject has fine, soft, or semi-transparent edges that must look perfect. Loose hair against trees, glassware, smoke, fur, lace, and overlapping objects can turn a quick edit into a slow one. I would also choose another editor if I need to keep a fully editable project with multiple layers, apply professional retouching, or finish the entire composition in one place.
Another reason to choose a different option is workflow scale. Editing one or two images on a phone is comfortable. Processing a large batch, keeping naming conventions, or matching cutouts precisely across a campaign is a different job. In that situation, a desktop workflow or a specialized batch tool is likely to save more time, even if the individual cutout is no better.
Small decisions that improve the final result
Start with the highest-quality original available. Sending a compressed image through several messaging apps before editing can soften the edge and make the background harder to distinguish. If the subject is small in the frame, crop it first so the boundary is easier to inspect. I prefer a little extra space around the subject during the initial cut, then refine the edge after confirming that no important detail has been removed.
Watch for shadows. A cast shadow may look like part of the background, but removing it can make an object appear to float when placed into a new scene. In some designs I keep a small, softened shadow as part of the subject; in others I remove it completely and add a new shadow later. The right choice depends on whether I want the cutout to look like a sticker, a product image, or a natural part of another photograph.
Pay attention to holes and enclosed areas. The space inside a handle, between bicycle spokes, or between an arm and a torso may need separate attention. A rough outer outline can still look convincing until those interior areas remain filled with the old background. I make a deliberate pass through these openings instead of assuming that the first selection handled them automatically.
Finally, preview the saved result in the app where it will be used. Some destinations display transparency correctly, while others show a solid background or convert the file in a way that changes the appearance. If the image looks wrong after sharing, I first check the destination’s handling of transparency before blaming the cutout itself. Keeping the original image also gives me a safe fallback if I need to export in a different format later.
My cautious verdict
Background Eraser is a focused, practical photography app rather than an all-purpose creative studio. I like it because it keeps the central task understandable: isolate the useful part of a photo and prepare it for another use. The developer, handyCloset Inc., has built a tool that suits quick phone-based editing, especially when the subject has a reasonably clear outline and I am willing to inspect the result instead of trusting a single automatic action.
Its limitations are equally clear. Difficult edges require time, the app is not a substitute for a full layer-based editor, and privacy still depends on the choices I make with the photos I import and share. Those are not reasons to dismiss it; they are boundaries that help me decide when it is the right tool.
For a free app in the photography category, I think it earns a place on a phone used for everyday visual projects. I would recommend it to a friend who asks for a straightforward way to create transparent cutouts, with one condition: use good source images, check the edges on the intended background, and keep sensitive photos out of casual experiments. If that matches your needs, this focused approach is more useful than a crowded editor. If you need complex masking, batch production, or a complete design workflow, choose a more advanced alternative instead.
FAQs for Background Eraser
What features does the Background Eraser app offer?
The Background Eraser app provides a range of features designed to help users easily remove backgrounds from images. It includes automated background detection, manual erasing tools for precision, and options to add new backgrounds. The app also supports multiple file formats, making it versatile for various editing needs.
Is the Background Eraser app user-friendly for beginners?
Yes, the Background Eraser app is designed to be user-friendly, catering to both beginners and advanced users. It offers a straightforward interface with guided tutorials and intuitive controls, ensuring that even those new to photo editing can achieve professional-looking results with minimal effort.
Does the Background Eraser app support high-resolution images?
The Background Eraser app supports high-resolution images, allowing users to edit photos without losing quality. This feature is particularly beneficial for professionals who require high-quality outputs for their work, ensuring that the final product is sharp and detailed.
Are there any in-app purchases or subscriptions in the Background Eraser app?
The Background Eraser app provides a free version with basic features. However, there are in-app purchases and subscription options available for users who wish to access premium features, such as advanced editing tools and ad-free experiences, offering more flexibility and enhanced functionality.
What are the common uses for the Background Eraser app?
The Background Eraser app is commonly used for creating promotional materials, enhancing personal photos, and designing social media content. Users can remove unwanted backgrounds to focus on the main subject, making it an excellent tool for marketers, influencers, and anyone looking to improve their visual content.
Pros
- User-friendly interface simplifies editing.
- Supports high-resolution image exports.
- Precise cutting tools enhance accuracy.
- Multiple background options available.
- Quick processing time for edits.
Cons
- In-app ads can be intrusive.
- Limited features in the free version.
- Occasional crashes on older devices.
- Subscription required for premium tools.
- No batch processing available.


